 Take a look at the two images above. Astute observer that you are, you'll notice that the illustration on the left is drawn with pure black lines, while the one on the right has more subtle colored lines. Both images are fine, but usually I prefer to use colored lines whenever possible. It gives the illustration a kind of animated feature feel, and just seems more polished.
But Bob, you're pleading? How can I get cool colored lines in my illustrations too? Get up off the floor and stop begging and I'll show you.
 First off, you need to draw something in Photoshop, like, oh, I don't know... a rat. Make sure you draw your character on a separate layer. This is very important! If your character is not on its own layer this tip will not work!
You may be wondering why I drew the rat with black lines if I'm wanting colored lines in the finished piece. It's because I don't always know what color my character will be. I could draw the rat's body with a dark blue line, but if I later decide the rat should have green fur I'd end up having to change the color of the lines. So draw it in black.
 Next, create another layer underneath the drawing layer and add color to your character. Use as many color layers as you want, it won't affect the lines. I usually use a ton of color layers.
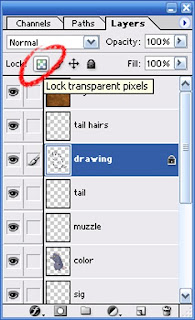
 Now you're ready to start adding color to your lines. Go over to your layers palette and make sure your drawing layer is selected and active. My drawing layer is helpfully labeled "drawing." Click the box at the top of the palette labeled "Lock." An icon of a lock will appear on your drawing layer.
 Now that your drawing layer is locked, you can color your lines to your heart's content and nothing else will be affected. Go ahead, try it. Use the paint brush and start scribbling over your lines. ONLY the lines of your drawing will be affected. The background and any other layers will remain untouched. Pretty cool, huh?
Again, note that this will only work if your drawing is on a separate layer. If you draw directly on the background, well, you're screwed.
 Now that your drawing layer is locked, you can start coloring your lines. Use the brush tool. It's pretty much like painting on the lines.
I think it looks best if your lines are a darker version of the color within. In the example above, the rat's fur is a bluish gray, so I colored the lines a darker version of that same color. Same goes for the ears and nose. Those lines are a darker pink.
You'll have to paint carefully in areas where different objects converge, such as where the rat's ear line touches his fur line. Use your best judgment to decide which line should be what color.

Here's the finished rat, complete with cool, subtle colored lines. Pretty easy, huh? Now all that's left is to add a background if you like, add your signature, and sell it for a thousand dollars.
Note that this is just the way I draw colored lines. There are probably a hundred other, possibly easier ways to achieve the same results. That's one of the cool things about Photoshop-- it's so versatile that there's more than one way to do things.


Another technique would be to add the Color Overlay Layer effect to the line art layer in Photoshop. Easy to make changes and it's non-destructive.
ReplyDeletevery very helpful tip thanks bob!
ReplyDeleteThanks, Brad!
ReplyDeleteGeorge: I admit I'm not an expert on the layer effects, but isn't the color overlay an either/or thing though? I thought it made everything the same color? Can you use it to make multicolor lines?
Do you have any advice on how to chose the right colors?
ReplyDeleteLike I said above, I just make the lines slightly darker than the fill color. In the example above, the rat has a pink tail, so I made the outline of his tale a slightly darker pink.
Delete